|
|
|
|
|
|
Valley
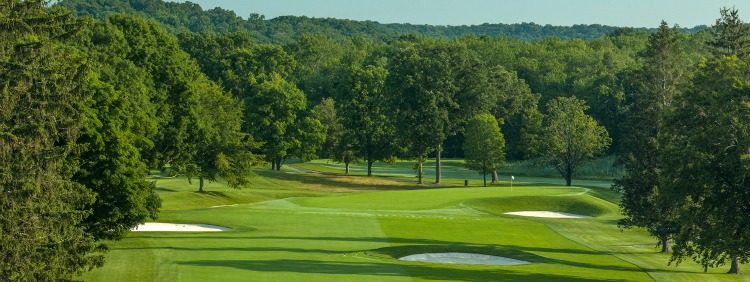
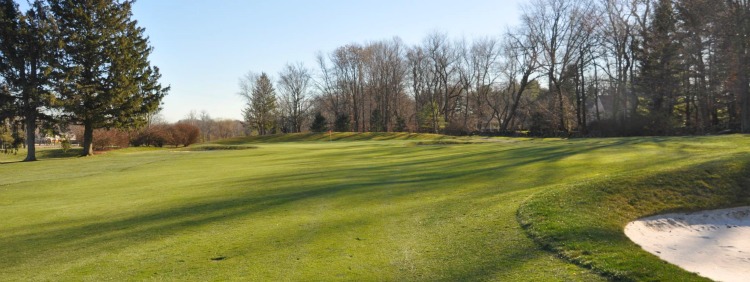
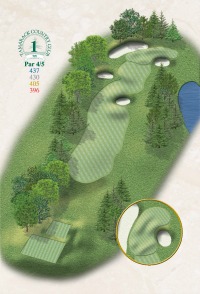 Hole #1 -Starting from the highest point on our property, it’s impossible for a golfer not to recognize what a special course you are about to play. We begin with a 430 yard par-4 with a bunker some 300 yards out in the center of the fairway. A large green complex wraps around a deep bunker in front. Although it is one of the most difficult holes on the golf course, the beauty of the Charles Banks design is that he provided an ample area to run the ball up towards the green so that players of all handicap levels have a chance to make par. If possible, keep the ball on the left side of the fairway to maximize your ability to hit the green. Hole #1 -Starting from the highest point on our property, it’s impossible for a golfer not to recognize what a special course you are about to play. We begin with a 430 yard par-4 with a bunker some 300 yards out in the center of the fairway. A large green complex wraps around a deep bunker in front. Although it is one of the most difficult holes on the golf course, the beauty of the Charles Banks design is that he provided an ample area to run the ball up towards the green so that players of all handicap levels have a chance to make par. If possible, keep the ball on the left side of the fairway to maximize your ability to hit the green.
| Yardage |
Black
437 |
Blue
437 |
White
430 |
Gold
405 |
Red
396 |
| Par: 4 | Men's Handicap: 5 | Ladies' Handicap: 5 |
Cape
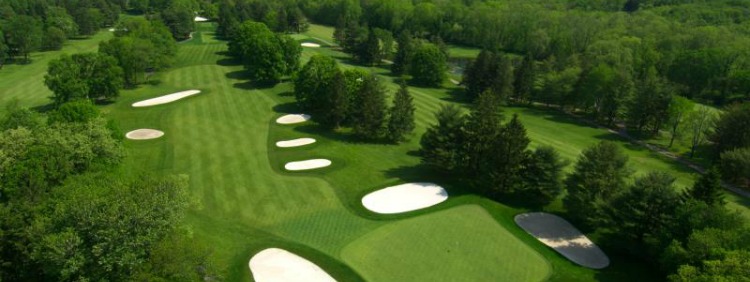
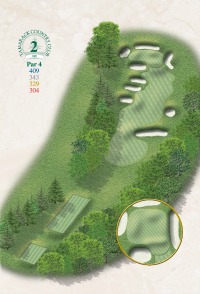 Hole #2 - A fairway cross bunker requires the player to hit their tee shot towards the tight left side of the fairway or take a chance and try to fly the bunker to get to the more optimal right side. The Cape green was built as a terrace surrounded by large bunkers on all sides. It’s important to get your ball to the middle of the green because a severe false front may cause a ball to appear safely on the green only to slowly roll off the front and back down towards the fairway. Hole #2 - A fairway cross bunker requires the player to hit their tee shot towards the tight left side of the fairway or take a chance and try to fly the bunker to get to the more optimal right side. The Cape green was built as a terrace surrounded by large bunkers on all sides. It’s important to get your ball to the middle of the green because a severe false front may cause a ball to appear safely on the green only to slowly roll off the front and back down towards the fairway.
| Yardage |
Black
409 |
Blue
386 |
White
343 |
Gold
329 |
Red
304
|
| Par: 4 | Men's Handicap: 9 | Ladies' Handicap: 11 |
Eden
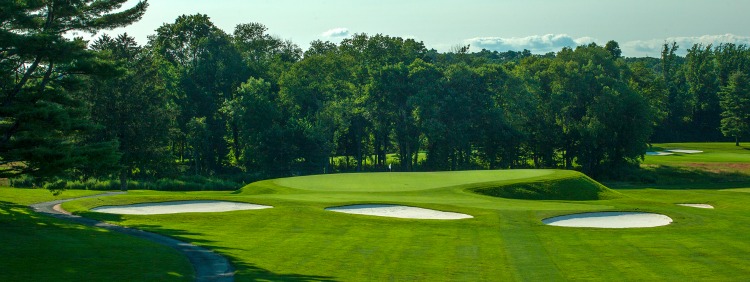
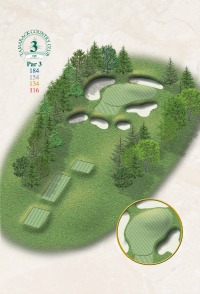 Hole #3 - Based upon the 11th hole at St. Andrews Old Course in Scotland, the hole named “Eden” is considered one of the finest of par-3’s in existence. Played anywhere from 150 yards to as much as 185 yards and surrounded by extremely large and deep bunkers, the green appears to float in mid-air. Although there is a small fairway in front of the green to help run a ball onto the putting surface, a high soft shot is the most ideal way to get on the green. Hole #3 - Based upon the 11th hole at St. Andrews Old Course in Scotland, the hole named “Eden” is considered one of the finest of par-3’s in existence. Played anywhere from 150 yards to as much as 185 yards and surrounded by extremely large and deep bunkers, the green appears to float in mid-air. Although there is a small fairway in front of the green to help run a ball onto the putting surface, a high soft shot is the most ideal way to get on the green.
| Yardage |
Black
184 |
Blue
162 |
White
154 |
Gold
134 |
Red
116 |
| Par: 3 | Men's Handicap: 17 | Ladies' Handicap: 17 |
Bottle

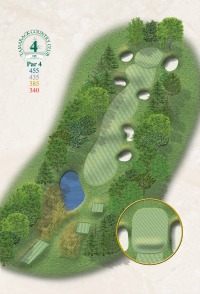 Hole #4 - Our #1 handicap hole on the golf course for men is a par-4 which is 455 yards long for most players and almost 500 yards from the Championship tees. Although there is ample room to place ones drive, bunkers extend up the right side if one goes astray. 100 yards short of the green two bunkers pinch the fairway requiring you to fully carry the ball towards the putting surface. Beyond those bunkers, the green is large and receptive as it takes two almost perfect shots to reach it. Hole #4 - Our #1 handicap hole on the golf course for men is a par-4 which is 455 yards long for most players and almost 500 yards from the Championship tees. Although there is ample room to place ones drive, bunkers extend up the right side if one goes astray. 100 yards short of the green two bunkers pinch the fairway requiring you to fully carry the ball towards the putting surface. Beyond those bunkers, the green is large and receptive as it takes two almost perfect shots to reach it.
| Yardage |
Black
484 |
Blue
455 |
White
435 |
Gold
385 |
Red
340 |
| Par: 4 | Men's Handicap: 1 | Ladies' Handicap: 1 |
Long

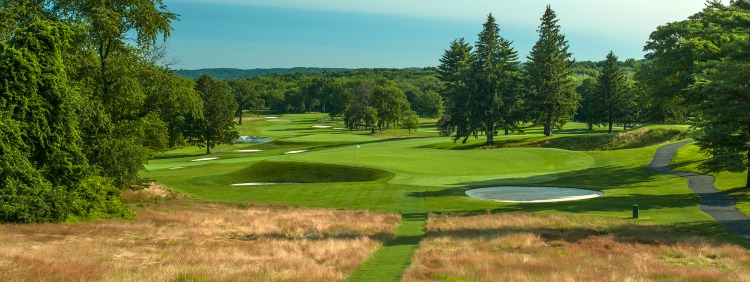
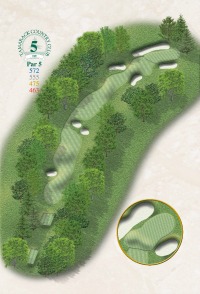 Hole #5 - Aptly named as it is the longest hole on the golf course, our 5th hole is a slight dogleg right to a long, narrow green. At over 550 yards and with strategically placed bunkers, all but the longest of long hitters play this as a three shot hole. Once past the dogleg, the view into the green is stunning as two large, deep bunkers on each side of the green make it seem small although it is 40 yards long! The green itself slopes severely from back to front so keeping the ball below the pin is important to make par. Hole #5 - Aptly named as it is the longest hole on the golf course, our 5th hole is a slight dogleg right to a long, narrow green. At over 550 yards and with strategically placed bunkers, all but the longest of long hitters play this as a three shot hole. Once past the dogleg, the view into the green is stunning as two large, deep bunkers on each side of the green make it seem small although it is 40 yards long! The green itself slopes severely from back to front so keeping the ball below the pin is important to make par.
| Yardage |
Black
572 |
Blue
572 |
White
555 |
Gold
475 |
Red
463 |
| Par: 5 | Men's Handicap: 3 | Ladies' Handicap: 3 |
Alps
 Hole #6 - Our 6th hole is based on the 17th hole at Prestwick Golf Club in Scotland which was designed by the legendary Old Tom Morris. In its purest form, Alps represents a blind approach shot over a high hill to a depressed green with a distinctive ridge running through the putting surface. In 1901, Golf Illustrated Magazine asked the greatest golfers of the day such as Harry Vardon and Willie Park Jr. what their favorite par-4 was and Alps was their unanimous choice. The 6th hole is still as fun and unpredictable to play now as it was then. Hole #6 - Our 6th hole is based on the 17th hole at Prestwick Golf Club in Scotland which was designed by the legendary Old Tom Morris. In its purest form, Alps represents a blind approach shot over a high hill to a depressed green with a distinctive ridge running through the putting surface. In 1901, Golf Illustrated Magazine asked the greatest golfers of the day such as Harry Vardon and Willie Park Jr. what their favorite par-4 was and Alps was their unanimous choice. The 6th hole is still as fun and unpredictable to play now as it was then.
| Yardage |
Black
412 |
Blue
394 |
White
384 |
Gold
348 |
Red
290 |
| Par: 4 | Men's Handicap: 11 | Ladies' Handicap: 9 |
Redan
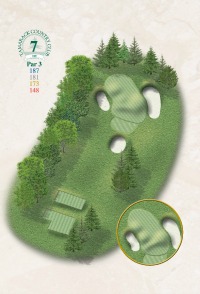 Hole #7 - The original Redan presides at North Berwick Golf Club in Scotland. It is considered by many to be the finest par-3 design in the world because of the combination of a tilted table top green, deep bunkers and the green set at an angle to the tee. McDonald, Raynor and Banks thought so highly of it that it became a staple on almost every course they ever built. The green is designed to take a low, running shot and deflect the ball back towards the center of the green setting up your par. Hole #7 - The original Redan presides at North Berwick Golf Club in Scotland. It is considered by many to be the finest par-3 design in the world because of the combination of a tilted table top green, deep bunkers and the green set at an angle to the tee. McDonald, Raynor and Banks thought so highly of it that it became a staple on almost every course they ever built. The green is designed to take a low, running shot and deflect the ball back towards the center of the green setting up your par.
| Yardage |
Black
187 |
Blue
187 |
White
181 |
Gold
173 |
Red
148 |
| Par: 3 | Men's Handicap: 15 | Ladies' Handicap: 15 |
Narrows
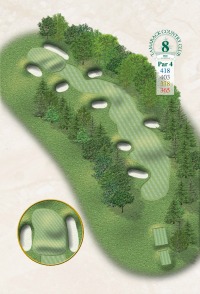 Hole #8 - Fashioned after the 15th hole at Muirfield in Scotland, our 8th hole has some of the most beautiful bunkering on the golf course from tee to green. The hole is identified by the “narrowing” of the approach shot from about 100 yards in to the green. The green itself slopes severely from back to front with a steep fall off to the rear. Although heavily bunkered, the brilliant Charles Banks provided ample room for all handicap levels to run the ball to the green. Hole #8 - Fashioned after the 15th hole at Muirfield in Scotland, our 8th hole has some of the most beautiful bunkering on the golf course from tee to green. The hole is identified by the “narrowing” of the approach shot from about 100 yards in to the green. The green itself slopes severely from back to front with a steep fall off to the rear. Although heavily bunkered, the brilliant Charles Banks provided ample room for all handicap levels to run the ball to the green.
| Yardage |
Black
418 |
Blue
418 |
White
403 |
Gold
378 |
Red
365 |
| Par: 4 | Men's Handicap: 7 | Ladies' Handicap: 7 |
Moat
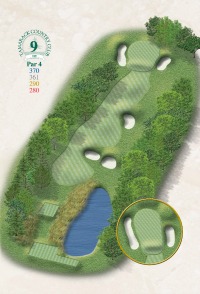 Hole #9 - A relatively short par-4 with a pond in front of the tee and lined by apple trees on the left side of the fairway is all about the second shot. The green is built on a plateau with nothing behind it which seems to give off the same appearance as an infinity pool. Deep bunkering on the left and right pinch the front half of the green while in back of the green lay a severely steep hill going some 20 feet down. When the pin is on the back of the green it almost appears to be hanging in mid-air which makes most players leave the ball short leaving an extremely long putt. Moat is short but certainly not easy. Hole #9 - A relatively short par-4 with a pond in front of the tee and lined by apple trees on the left side of the fairway is all about the second shot. The green is built on a plateau with nothing behind it which seems to give off the same appearance as an infinity pool. Deep bunkering on the left and right pinch the front half of the green while in back of the green lay a severely steep hill going some 20 feet down. When the pin is on the back of the green it almost appears to be hanging in mid-air which makes most players leave the ball short leaving an extremely long putt. Moat is short but certainly not easy.
| Yardage |
Black
370 |
Blue
370 |
White
361 |
Gold
290 |
Red
280 |
| Par: 4 | Men's Handicap: 13 | Ladies' Handicap: 13 |
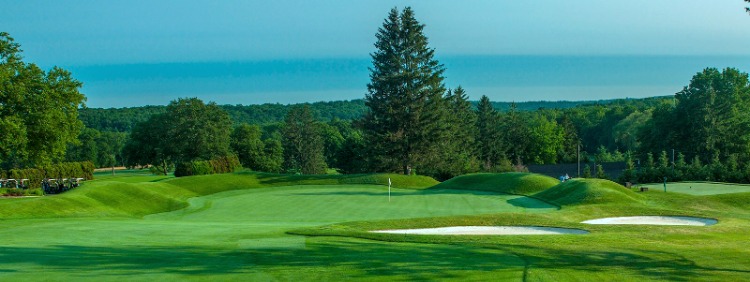
Knoll
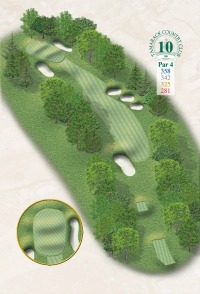 Hole #10 - Loosely based on the 4th hole at Scotscraig Golf Club in Scotland, the relatively short par-4 still requires some strategy. Fairway bunkers down the right side and trees down the left require a straight tee shot leading to one of Tamarack’s smaller greens with steep falloffs to the right and rear. The putting surface features a rear plateau fronted by a slope to a collection area on the lower tier. Going over this green is ill-advised! Leave the ball short of the hole to have your best chance at making par. Hole #10 - Loosely based on the 4th hole at Scotscraig Golf Club in Scotland, the relatively short par-4 still requires some strategy. Fairway bunkers down the right side and trees down the left require a straight tee shot leading to one of Tamarack’s smaller greens with steep falloffs to the right and rear. The putting surface features a rear plateau fronted by a slope to a collection area on the lower tier. Going over this green is ill-advised! Leave the ball short of the hole to have your best chance at making par.
| Yardage |
Black
358 |
Blue
358 |
White
342 |
Gold
325 |
Red
281 |
| Par: 4 | Men's Handicap: 14 | Ladies' Handicap: 14 |
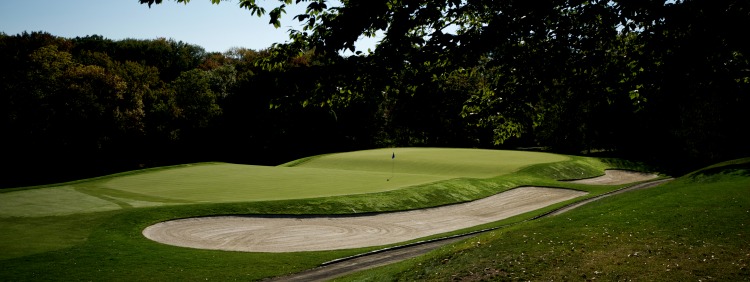
Punchbowl
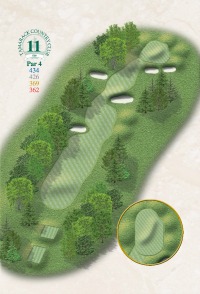 Hole #11 - The name Punchbowl is somewhat of a generic term on early golf courses where greens were located in natural hollows as our 11th green is. In the days before irrigation systems existed, the Punchbowl retained water which led to healthier grass. At over 400 yards, our 11th hole is especially difficult as only the top third of the flagstick is visible. The slope of the fairway tends to kick the tee shot to the right while the second shot requires you to aim towards the left half of the green making for an extremely challenging hole. Letting your ball run down towards the punchbowl towards the pin is far easier than flying it on the green. Hole #11 - The name Punchbowl is somewhat of a generic term on early golf courses where greens were located in natural hollows as our 11th green is. In the days before irrigation systems existed, the Punchbowl retained water which led to healthier grass. At over 400 yards, our 11th hole is especially difficult as only the top third of the flagstick is visible. The slope of the fairway tends to kick the tee shot to the right while the second shot requires you to aim towards the left half of the green making for an extremely challenging hole. Letting your ball run down towards the punchbowl towards the pin is far easier than flying it on the green.
| Yardage |
Black
434 |
Blue
434 |
White
426 |
Gold
369 |
Red
362 |
| Par: 4 | Men's Handicap: 6 | Ladies' Handicap: 54 |
Biarritz
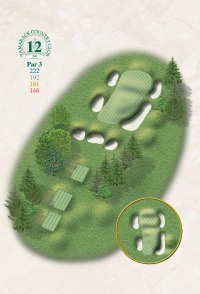 Hole #12 - One of the most unique holes in all of golf, the Biarritz is sometimes known as “The Chasm Hole” because the original hole in France stretched 220 yards over the Bay of Biscay. The deep swale in the middle of the green was sometimes referred to as “The Valley of Sin” and it too became a mainstay in nearly every course McDonald, Raynor and Banks ever built. The green is almost 70 yards long and the hole was designed to be played with what was then known as a “push shot” or a low ball which would land short of the swale and run through it to the back of the green. Bunkers border the right side of the hole while the left and back have a steep falloff testing a player’s ability to recover. We believe that our 12th hole is one of the finest Biarritz ever created and certainly one of the most difficult holes on our golf course. Hole #12 - One of the most unique holes in all of golf, the Biarritz is sometimes known as “The Chasm Hole” because the original hole in France stretched 220 yards over the Bay of Biscay. The deep swale in the middle of the green was sometimes referred to as “The Valley of Sin” and it too became a mainstay in nearly every course McDonald, Raynor and Banks ever built. The green is almost 70 yards long and the hole was designed to be played with what was then known as a “push shot” or a low ball which would land short of the swale and run through it to the back of the green. Bunkers border the right side of the hole while the left and back have a steep falloff testing a player’s ability to recover. We believe that our 12th hole is one of the finest Biarritz ever created and certainly one of the most difficult holes on our golf course.
| Yardage |
Black
222 |
Blue
212 |
White
192 |
Gold
161 |
Red
146 |
| Par: 3 | Men's Handicap: 12 | Ladies' Handicap: 10 |
Double Plateau
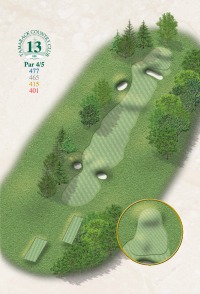 Hole #13 - Played as a par-5 for most golfers and as an extremely long par-4 for the lower handicaps, the 13th hole uniqueness lies in its green which was based on many natural plateau greens in the British Isles. The green features a small front left plateau as well as a short back plateau which tests the player’s ability to get the ball close to the pin. If you leave the ball on the wrong plateau, the green challenges your putting skills to their fullest. Hole #13 - Played as a par-5 for most golfers and as an extremely long par-4 for the lower handicaps, the 13th hole uniqueness lies in its green which was based on many natural plateau greens in the British Isles. The green features a small front left plateau as well as a short back plateau which tests the player’s ability to get the ball close to the pin. If you leave the ball on the wrong plateau, the green challenges your putting skills to their fullest.
| Yardage |
Black
477 |
Blue
477 |
White
465 |
Gold
415 |
Red
401 |
Par: 4 Black/Blue Par: 5 White | Men's Handicap: 4/12 | Ladies' Handicap: 12
|
Road Hole
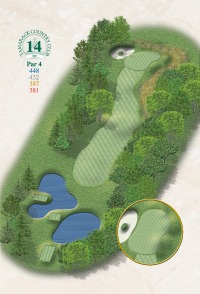 Hole #14 - The second hardest hole on our golf course is a par-4 of over 450 yards of length. The entire right side of the hole is a hazard while the left side is pinched by trees. The green is somewhat triangular in shape with shallow depth on the right side nearest the hazard. Two great shots are required to get the ball on the green in regulation. Hole #14 - The second hardest hole on our golf course is a par-4 of over 450 yards of length. The entire right side of the hole is a hazard while the left side is pinched by trees. The green is somewhat triangular in shape with shallow depth on the right side nearest the hazard. Two great shots are required to get the ball on the green in regulation.
| Yardage |
Black
448 |
Blue
448 |
White
432 |
Gold
387 |
Red
381 |
| Par: 4 | Men's Handicap: 2 | Ladies' Handicap: 2 |
Short
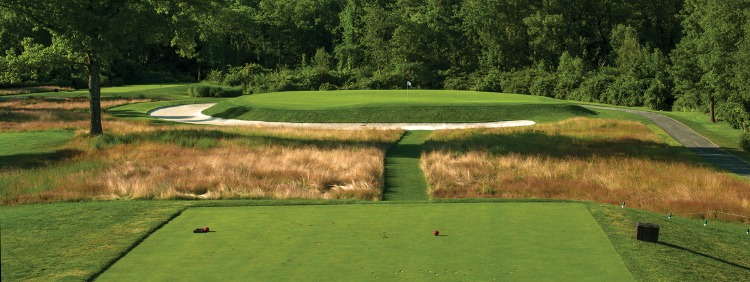
 Hole #15 - Based on the 5th hole at Royal West Norfolk in England, our “Short” hole is far from a pushover. The generous green is much wider than it is deep and the greenside bunkering surrounds the putting surface to create an island effect. The putting surface is without a doubt one of the hardest to read on the golf course thereby making it harder than its 135 yard length belies. A Short is designed specifically to examine the short iron and putting skills of the golfer and #15 does just that. Hole #15 - Based on the 5th hole at Royal West Norfolk in England, our “Short” hole is far from a pushover. The generous green is much wider than it is deep and the greenside bunkering surrounds the putting surface to create an island effect. The putting surface is without a doubt one of the hardest to read on the golf course thereby making it harder than its 135 yard length belies. A Short is designed specifically to examine the short iron and putting skills of the golfer and #15 does just that.
| Yardage |
Black
147 |
Blue
147 |
White
134 |
Gold
115 |
Red
99 |
| Par: 3 | Men's Handicap: 18 | Ladies' Handicap: 18 |
Drive & Pitch
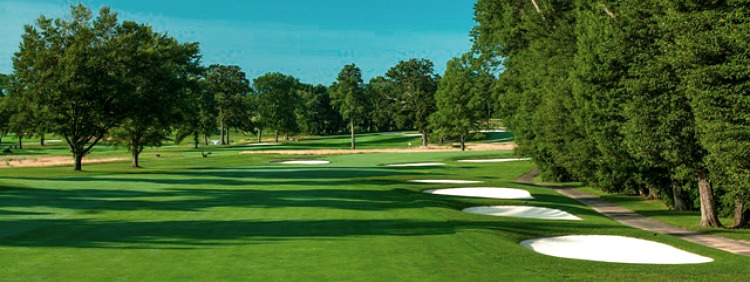
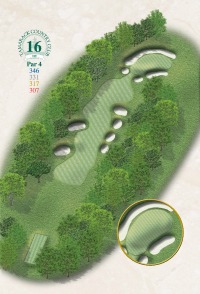 Hole #16 - A mere 340 yards in length, many members feel our 16th hole is much harder than its name suggests. Bunkers run down both sides of the fairway providing the smallest driving area on the golf course. A relatively short pitch to the green is hindered by surrounding bunkers and a severe slope to the front of the green. Unlike many holes on Tamarack which provide a large run up area to the green, our 16th hole requires you to fly the ball onto the putting surface. Leaving your second shot above the hole can easily lead to a disappointing 3 putt. Hole #16 - A mere 340 yards in length, many members feel our 16th hole is much harder than its name suggests. Bunkers run down both sides of the fairway providing the smallest driving area on the golf course. A relatively short pitch to the green is hindered by surrounding bunkers and a severe slope to the front of the green. Unlike many holes on Tamarack which provide a large run up area to the green, our 16th hole requires you to fly the ball onto the putting surface. Leaving your second shot above the hole can easily lead to a disappointing 3 putt.
| Yardage |
Black
346 |
Blue
346 |
White
331 |
Gold
317 |
Red
307 |
| Par: 4 | Men's Handicap: 16 | Ladies' Handicap: 16 |
Sahara
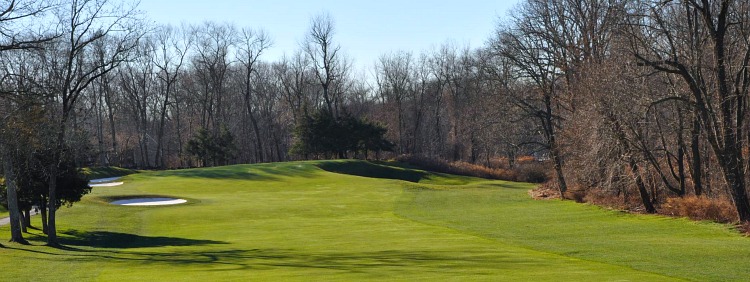
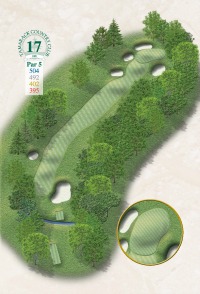 Hole #17 - Based upon a short par-4 on Royal St. George’s in England, our 17th hole is a medium length par-5 dogleg right. What they both share is a tee shot over a large expanse of sand hence the name Sahara. Attempting to reach the green in two shots is difficult even for the low handicap as the green is on a plateau and guarded by “Big Bertha” which is an immense bunker some 20 feet below the putting surface. Charles Banks loved false fronts on his greens and this one is severe. Make sure you get your ball to the middle of the green to avoid it rolling all the way down the hill. Hole #17 - Based upon a short par-4 on Royal St. George’s in England, our 17th hole is a medium length par-5 dogleg right. What they both share is a tee shot over a large expanse of sand hence the name Sahara. Attempting to reach the green in two shots is difficult even for the low handicap as the green is on a plateau and guarded by “Big Bertha” which is an immense bunker some 20 feet below the putting surface. Charles Banks loved false fronts on his greens and this one is severe. Make sure you get your ball to the middle of the green to avoid it rolling all the way down the hill.
| Yardage |
Black
504 |
Blue
504 |
White
492 |
Gold
402 |
Red
395 |
| Par: 5 | Men's Handicap: 10 | Ladies' Handicap: 8 |
Strategy
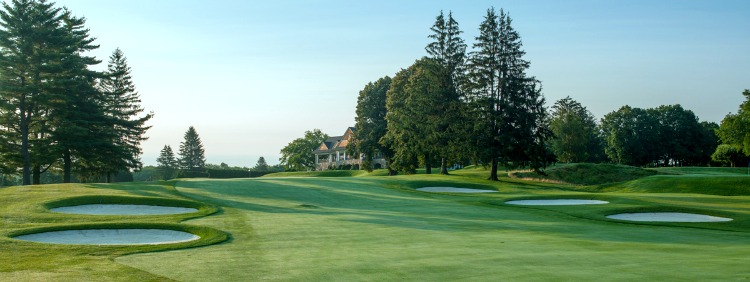
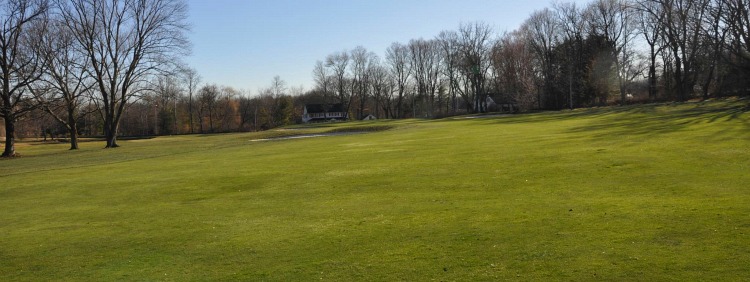
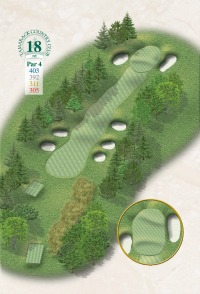 Hole #18 - Our final hole is lined with bunkers up both sides of the fairway and the beauty of our Clubhouse behind the green. An uphill second shot makes the hole feel longer than the 400 yards it actually is but there is plenty of room in front of the green should you not reach. The green itself tilts moderately from both right to left and from back to front so be gentle. A ball left above the hole could cause you to find yourself with a longer second putt than your first. Hole #18 - Our final hole is lined with bunkers up both sides of the fairway and the beauty of our Clubhouse behind the green. An uphill second shot makes the hole feel longer than the 400 yards it actually is but there is plenty of room in front of the green should you not reach. The green itself tilts moderately from both right to left and from back to front so be gentle. A ball left above the hole could cause you to find yourself with a longer second putt than your first.
| Yardage |
Black
432 |
Blue
402 |
White
392 |
Gold
311 |
Red
305 |
| Par: 4 | Men's Handicap: 8 | Ladies' Handicap: 5 |
|
|
|
|
|
|